Introduction to Nozzle Height in 3D Printing
In the world of 3D printing, achieving the perfect print is often a matter of fine-tuning various settings, with nozzle height being one of the most crucial. The height of the nozzle relative to the build plate can significantly impact the quality of the print. Understanding how to adjust and what each height level means for your print is key to mastering 3D printing.

Different Nozzle Heights and Their Effects
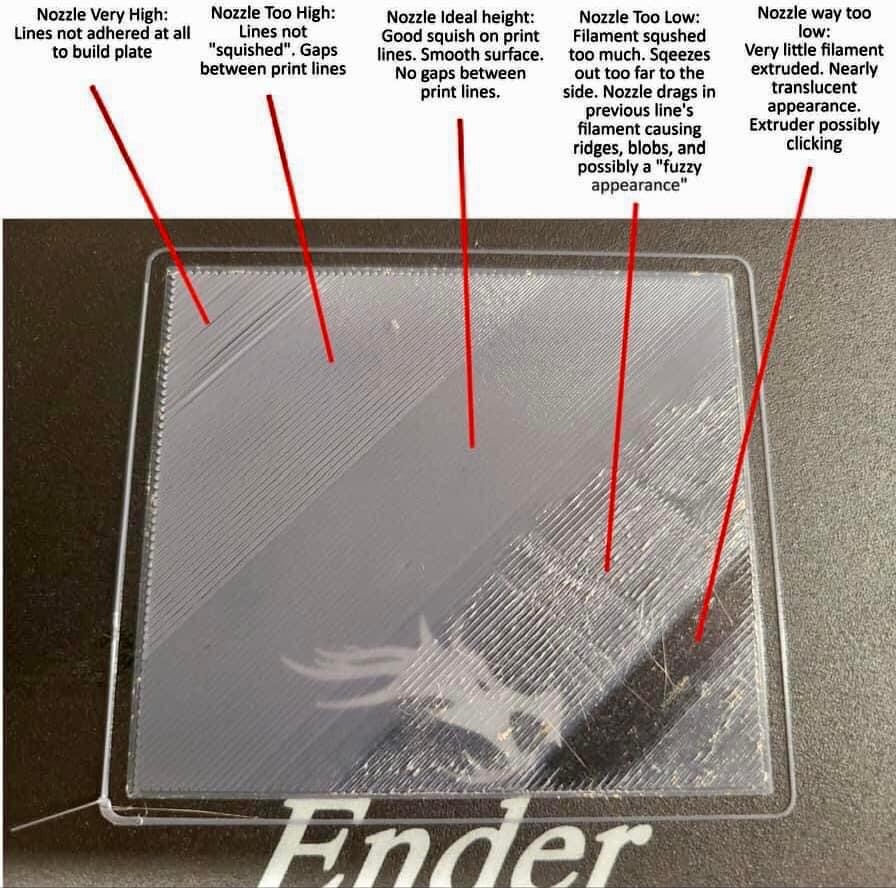
Nozzle Very High
- Symptoms: When the nozzle is too high, the filament doesn’t adhere to the build plate, leading to a print that lacks foundation and stability.
- Solution: Lower the nozzle slightly and recalibrate to ensure proper adhesion to the build plate.
Nozzle Too High
- Symptoms: A nozzle that’s slightly too high results in print lines that aren’t “squished” enough, creating gaps between them.
- Solution: Adjust the nozzle to be closer to the build plate for better adhesion and cohesion between the print lines.
Nozzle at Ideal Height
- Ideal Outcome: The perfect nozzle height gives a good squish on print lines, resulting in a smooth surface with no gaps between lines. This is the sweet spot for most prints.
- Maintaining Consistency: Regularly check and maintain this ideal height for consistent print quality.
Nozzle Too Low
- Symptoms: If the nozzle is too low, the filament is squished excessively, causing it to spread too far sideways. This can lead to the nozzle dragging in the previously extruded filament, creating ridges, blobs, and a possible “fuzzy” appearance.
- Solution: Raise the nozzle slightly and recalibrate to avoid excessive squishing of the filament.
Nozzle Way Too Low
- Symptoms: An extremely low nozzle height leads to very little filament being extruded, resulting in a nearly translucent appearance. The extruder may also make clicking sounds.
- Solution: Increase the nozzle height significantly to allow proper filament extrusion.
Additional Tips for Perfecting 3D Prints
Regular Calibration
Regularly calibrating your 3D printer is essential for maintaining the ideal nozzle height. This ensures consistent print quality and reduces the likelihood of print failures.
Understanding Your Printer and Filament
Different printers and filaments may require slightly different nozzle height settings. Familiarize yourself with your specific printer’s requirements and the properties of the filament you are using.
Monitoring the First Layer
The first layer of your print can tell you a lot about your nozzle height. Pay close attention to it and make adjustments as needed for subsequent layers.
Cleaning and Maintenance
Keep the nozzle clean and free of any obstructions. Regular maintenance of your printer can prevent issues related to nozzle height and filament extrusion.
Mastering the art of 3D printing involves understanding the nuances of nozzle height and its impact on your prints. By recognizing the symptoms of incorrect nozzle height and knowing how to adjust it, you can significantly improve the quality of your 3D prints. Remember, patience and practice are key to achieving those perfect prints.
Adjusting Nozzle Height: The Key to Perfect 3D Prints
Properly adjusting the nozzle height in 3D printing is crucial for achieving high-quality prints. The recommended height between the nozzle and the bed typically ranges from 0.1mm to 0.3mm, depending on the printer and material used. This precise measurement can be challenging to achieve, but with the right tools, such as the 🌟 32 Blades Steel Feeler Gauge 🌟, it becomes a more manageable task.
How to Use a Feeler Gauge for Nozzle Height Adjustment
The 32 Blades Steel Feeler Gauge is an essential tool for accurately measuring the gap between the nozzle and the print bed. Here’s how to use it:
- Select the Right Blade: Choose a blade from the feeler gauge set that corresponds to the recommended height for your printer.
- Position the Gauge: Slide the blade between the nozzle and the print bed. There should be slight resistance when moving the blade, but it shouldn’t be too tight or too loose.
- Adjust Accordingly: If the blade doesn’t fit or fits too loosely, adjust the height of the nozzle and retest until you achieve the desired resistance.
Understanding the Importance of Nozzle Height
- Adhesion and Quality: The correct nozzle height is vital for ensuring the first layer of your print adheres well to the bed without being too squished or too loose.
- Avoiding Damage: An incorrect height can lead to nozzle or bed damage, especially if the nozzle is too low and scrapes against the bed.
How Often Should You Check and Adjust Nozzle Height?
Regular checks are essential:
- Before Each Print: It’s good practice to check the nozzle height before starting a new print job, as even minor shifts can impact print quality.
- After Maintenance: Always recheck the nozzle height after performing any maintenance on your printer.
Can Nozzle Height Vary Based on Printer Model?
Yes, nozzle height can vary:
- Printer Specifications: Each printer model may have its specific recommended nozzle height, so it’s important to refer to your printer’s manual.
- Material Considerations: Different printing materials may require slight adjustments in nozzle height for optimal results.
Mastering nozzle height adjustment is a critical skill in 3D printing. Tools like the 🌟 32 Blades Steel Feeler Gauge 🌟 make this task more precise and less daunting. By regularly checking and adjusting the nozzle height, you ensure the best possible foundation for your prints, leading to higher quality and more consistent results.
As an Amazon Associate we earn from qualifying purchases through some links in our articles.


