If you’re a WordPress user, you’re likely familiar with the convenience of adding images to your posts and pages. However, have you ever found it tedious to resize images manually each time you upload them? Good news! WordPress allows you to set a default image upload size to streamline your content creation process. In this guide, we’ll walk you through the steps to make this workflow smoother.
Why Set a Default Image Upload Size?
Setting a default image upload size in WordPress can save you time and effort. Rather than resizing every image individually, you can specify a default size, ensuring that all newly uploaded images conform to your preferred dimensions. Whether you’re a blogger, photographer, or website owner, this feature can be a game-changer.
Step-by-Step Guide:
1. Access Your WordPress Dashboard
Log in to your WordPress website and access your dashboard. To set the default image size, you’ll need to navigate to a specific configuration page.
2. Go to the Options Page
In your browser’s address bar, type the following URL, replacing “mywebsite.com” with your actual website’s domain. https://mywebsite.com/wp-admin/options.php
Hit Enter, and you’ll be directed to a page with various configuration options. Don’t worry; we’ll make this process straightforward.
3. Find the Image Default Size Option
To quickly locate the option you need, use your browser’s “Find” function. Press Ctrl + F (or Command + F on Mac) to open the search bar. Then, type “image_” into the search field.
4. Adjust the Image Default Size
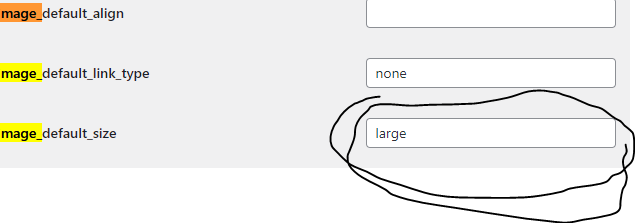
You should see three image-related options: image_default_align, image_default_link_type, and image_default_size. Click on the “image_default_size” option, and it will open an editable field.
5. Set Your Preferred Default Size
In the “image_default_size” field, you can specify your desired default image size. For instance, you can enter “medium” or “large” based on your website’s layout and design. WordPress recognizes these predefined sizes and will automatically resize new image uploads accordingly.
6. Save Changes
After entering your preferred default image size, scroll down to the bottom of the page and click the “Save Changes” button. This ensures that your setting is applied.
Enjoy the Benefits
Congratulations! You’ve successfully set your default image upload size in WordPress. From now on, when you add images to your posts or pages, they will automatically conform to the size you’ve specified, making your content creation process more efficient and consistent.
Whether you’re a content creator or website owner, this simple tweak can save you valuable time and ensure a more visually cohesive website. So, go ahead and explore the possibilities of WordPress, knowing that you’ve optimized your image workflow.
As an Amazon Associate we earn from qualifying purchases through some links in our articles.